Tier playbook
The three zones, side by side
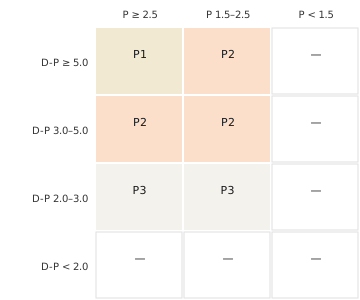
P1, P2, and P3 aren’t three severities of the same thing — they’re three different combinations of slot and day participation, each one a genuinely different situation to be looking at.
Takeaway: Which tier fired changes what else is worth checking, not just how loudly to pay attention.
What
Tier is the entry point into a scan: one label summarizing whether today’s participation is aligned, and how strictly. Everything else on the row — Vol, structure, 4H, OI — is context for what that tier actually means for this symbol right now.
So what
A P1 is rare enough that it’s usually worth a look on its own, but Vol and 4H tell you whether the move behind it is expanding or already stretched. A P2 or P3 benefits more from corroboration — structure agreeing, or OI showing fresh rather than crowded positioning — before it’s worth the same attention as a P1.
Now what
Start every scan at Tier and 1st — what fired, and how recently. From there, pull in P and D-P to see whether the tier is being driven by a slot spike or a heavier whole day, then structure and energy columns to judge whether the move has room left or is already extended. The tier gets you to the row; the rest of the grid decides whether it’s worth the next click into the chart.